WordPress Multisite Installation To Run A Network of Websites
When you launch a web-based business and operate it carefully, success comes in your way sooner or later. It helps you to make more revenues. Soon, you start to feel the need for more than one website to meet the rapidly growing demands of the existing and potential customers. A good number of individuals don’t have sufficient budget to create and manage different websites separately. This is where the WordPress Multisite network comes into the picture? What exactly is this? How it works and benefits entrepreneurs? Let’s find out.
As a matter of fact, WordPress Multisite network is a technology that allows you to manage multiple WordPress sites from one control panel. It also enables you to update and install plugins and themes within a few clicks and manage a common database for all websites. You can use the WordPress Multisite network if your company has several departments and each department needs a separate website for the successful operation of the business. This technique helps you to save lots of money and energy used to run multiple websites.
WordPress Multisite Network Installation Process: An All-inclusive Guide
Basic Requirements for installing WordPress Multisite:
- A Good Hosting with PHP support. Make sure that your hosting has enough resources (bandwidth) to support the Multisite network and sustain the burden of a large number of regular visitors.
- You must have at least the basic knowledge of WordPress. If you are not acquainted with that, take the help of a WordPress development company in this regard.
1. Backup Your Website Data In Advance
Before making any change to your website, it is always recommended that you should take its complete backup in advance. This is because unexpected happenings (human errors, hacking attempts, shortage of resources, deterioration of files, malware, etc) can take place when you implement changes in the live site. Always keep in mind that even the most reliable hosting providers don’t provide a reliable 100% protection to your website database.
So, you must take website backup using WordPress Backup Plugins. Just store your important files on computers/laptops and cloud devices. This will help you to easily restore your website if something wrong happens all of a sudden.
2. Select A Domain Structure For Your Multisite Network
You have two options to add new sites on a WordPress multisite network- Domain or sub-directories.
http://site1.example.com
http://example.com/site1/
In case, you go for subdomains, just configure them on your server. If you select subdirectories, you will have to enable pretty permalinks on your root site.
3. Setup Subdomains
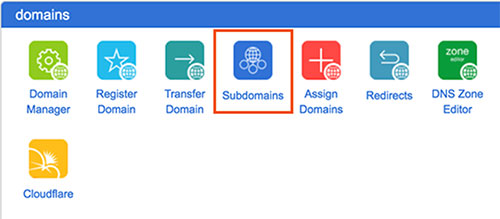
If you choose subdomains for websites on your multisite network, just go to your WordPress hosting account’s cPanel dashboard-Domains section- Subdomains. cPanel will trace the document root automatically and demonstrate it. Click on the ‘Create’ button to add your subdomain.
4. Activate The Multisite Mode
The Multisite Network feature remains in each WordPress installation. By default, this feature is turned off. So, you can turn it on from the control panel of your website. To do so, manually edit the wp-config.php file by following the below-mentioned steps:
- Log in to cPanel
- Click File Manager
- Open the public_html folder with a double click
- Click on the file wp-config.php and choose the Edit option
- Find this line:
/* That’s all, stop editing! Happy blogging. */
Put this code after this line:
/* Multisite */
define('WP_ALLOW_MULTISITE', true );
Save the changes you have made.
5. Setup Network For Your Multisite
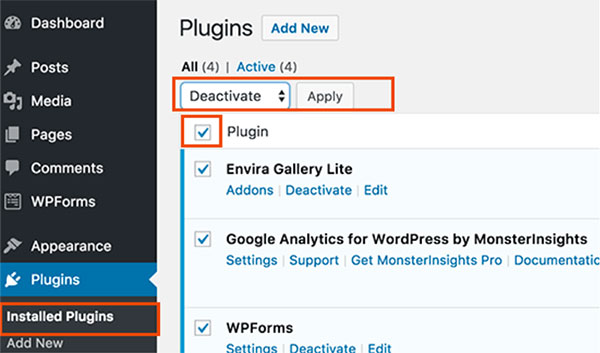
Now, you need to set up your network for WordPress multisite. For that, just deactivate all plugins on your website by going to Plugins > Installed Plugins > All plugins > Bulk Actions > Deactivate. Click the Apply button.
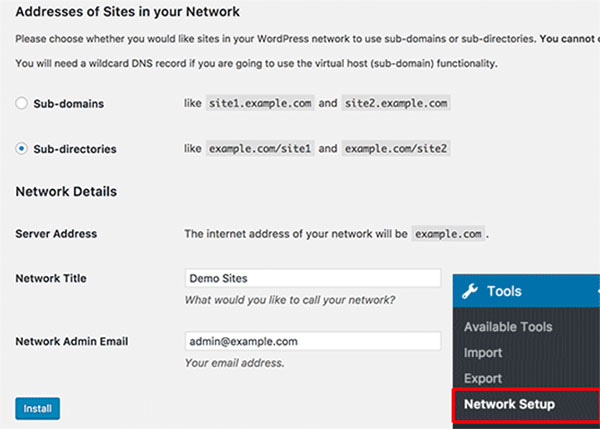
Now, you need to advance towards Tools > Network Setup page so that you may configure your multisite network. You can see a notice on the network setup screen. You need to inform the WordPress what type of domain structure you would like to use for websites on your network-Subdomains or Sub-directories. Just choose a title for your network and use a correct email address to access the network admin area.
Click on the install button to continue the process and configure your multisite network. Make necessary arrangements in the network configure setting as per your specific needs. If you don’t have a clear understanding of all these procedures, never hesitate to avail of the assistance offered by a WordPress web Development company.
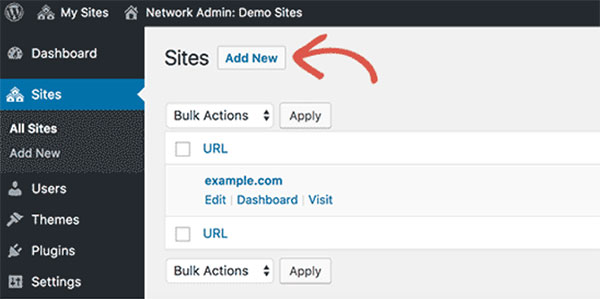
6. Add New Websites To Your Multisite Network
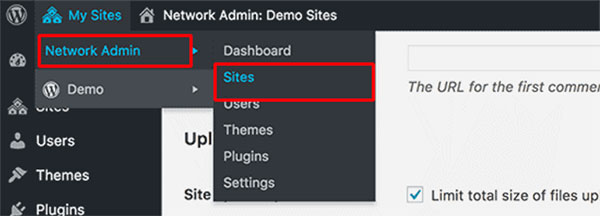
Now, it’s time to add new websites to your WordPress multisite. You can do this easily by clicking on Sites under My Sites » Network Admin menu in the admin toolbar. You should give the site’s address on the ‘Add New Site’ page. Also, add the site admin’s email address and give a site title.
By now, your WordPress Multisite is ready for use. Just install necessary themes/plugins on new websites as per your needs and start running multiple WordPress websites from one backend.
Final Words
WordPress multisite is an extremely beneficial technique for all those entrepreneurs who want to run multiple websites with a low investment. By following the above-mentioned steps, they can easily install the Multisite Network feature on their WordPress websites. A WordPress Development firm can also help you to start multiple websites from a single backend.
Author Bio
Marie Thomas is a WordPress developer by profession and Writer by hobby. She works for Wordsuccor Ltd., that is one of the best PSD to WordPress conversion based company in the USA. If you need to hire a WordPress developer you can contact them on Google+, Facebook, and Twitter.