Setting Up Less.js on Client Side: A How to Guide
CSS3 provides several exciting possibilities to enhance the visual aesthetics of a design. In fact, it has gained wide popularity because of the ease it provides in making the changes – that are otherwise difficult to achieve using the JavaScript plugins. However, it has some limitations as well. Working on complex CSS files (ideally the one having a thousand lines of code) can give you a hard time (especially if you’re just a rookie developer). But, thanks to Less.js, you can write learner code in a quick manner, and more importantly, you can extend CSS capability.
What will this tutorial help you with?
So, let’s get to know more about the 4 proven methods of converting a plain website into a retina-ready portal.
Less.js is a CSS-preprocessor, which helps extend the feature set of CSS in a more dynamic way, by allowing writing the stylesheets using the variables, mixins, and other techniques. In essence, Less.js is the latest JavaScript implementation of LESS that helps in simplifying your complex CSS files.
Less.js can run on both server-side as well as client-side using Node.js or Rhino. However, in this post, we’ll discuss how you can set it up for web development on the client-side.
Setting Up Less.js on Client Side
One of the fastest ways that help you install Less.js on client-side (i.e. at runtime in the browser) requires you to reference the less.js library (provided in an HTML document).
For this purpose, you need to follow the step-by-step process as discussed below:
Step 1 – The very first thing you should do is download Less.js from GitHub. But if you use Git, then another possible alternative requires firing up the CLI (Command Line Interface) and move to the project’s directory. And then, you just need to clone the Less rep to your system using the following command:
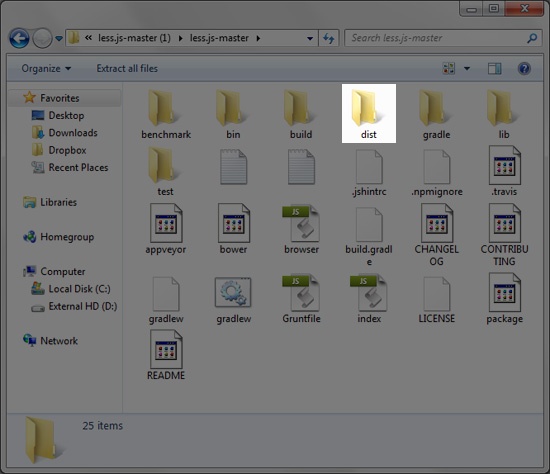
git clone https://github.com/less/less.js.gitStep 2 – Open the less.js-master directory. It contains several files and directories inside it, however, we need to focus on what the “dist” (or distribution) directory contains.
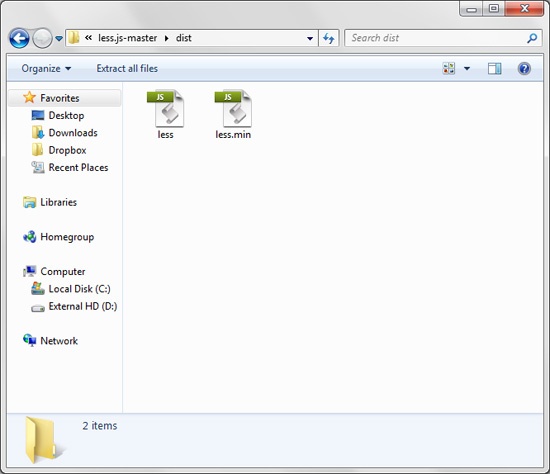
Step 3 – You will find two files within the dist directory, namely less.js and less.min.js. You can choose to work on any one of these LESS JS files. If you’re interested in reading source code, then less.js is an ideal choice for you. The less.js file is the commented version, but if you’re searching for a minified version of the LESS file having small file size, then less.min.js is what you need.
Step 4 – Next, you need to save less.js or less.min.js in your project’s directory.
Step 5 – Open a text or code editor of your choice, and then create an HTML document. In addition, create a Less stylesheet having .less extension. For example, styles.less.
Now inside the tag of your HTML document, you need to reference your Less stylesheet (i.e. style.less), and the Less JS file (less.js or less.min.js) as follows:
<head>
<link href="styles.less" type="text/css" rel="stylesheet/less"/>
<script src="less.js" type="text/javascript"></script>
</head>
Testing the Less.js Setup
So, now that you’re ready to utilize LESS on the client-side, it is important to test whether your setup works or not. In that case, you will first have to write Less syntax in your style.less file, and then evaluate if the stylesheet is executed correctly in your browser.
The HTML Markup
<!DOCTYPE html>
<html>
<head>
<title>Less.js: Quick Setup</title>
<link href="styles.less" type="text/css" rel="stylesheet/less"/>
<script src="less.js" type="text/javascript"></script>
</head>
<body>
<h1>Less.js: Quick Setup</h1>
<p><a href="http://sixrevisions.com/tutorials/set-up-less-js/">Read the tutorial</a></p>
</body>
</html>
LESS CSS
/* Variables */

@body-bg-color: #83b692; // green
@text-color: #fff; // white
@button-bg-color: #f9627d; // pink

/* LESS CSS */

body {
background: @body-bg-color;
color: @text-color;
font-family: sans-serif;
text-align: center;
}

a:link, a:visited {
background: @button-bg-color;
color: @text-color;
display: inline-block;
padding: 10px 10px;
text-decoration: none;
}

a:hover {
background-color: desaturate(@button-bg-color, 50%);
}

a:active {
background-color: saturate(@button-bg-color, 50%);
}
Result:

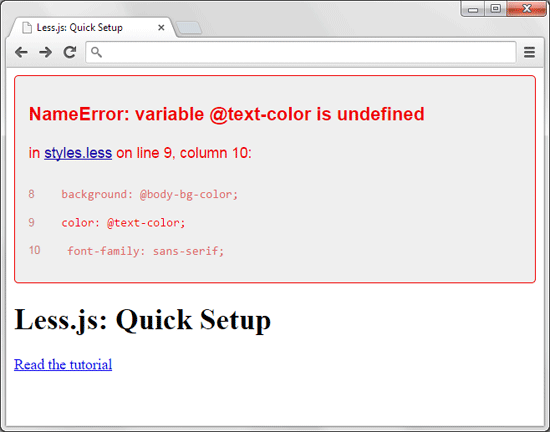
Less, by default, provide warnings if it encounters any errors in the web page – when that page is executed in the browser. Put it simply, Less will let you know if any syntax error occurs in your Less stylesheet (as shown in the screenshot below):
Final Output
Now let us see the final output when the Less.js file gets converted into a CSS file:
/* Variables */

/* LESS CSS */

body {
background: #83b692;
color: #ffffff;
font-family: sans-serif;
text-align: center;
}

a:link,
a:visited {
background: #f9627d;
color: #ffffff;
display: inline-block;
padding: 10px 10px;
text-decoration: none;
}

a:hover {
background-color: #d08b97;
}

a:active {
background-color: #ff5c79;
}
Let’s Wrap Up!
Reading this post will help you come to know about the fastest method, using which you can make your .less files up and running on the client-side server in no time. But this method is only ideal to be used for exploring and testing your Less.js setup. That’s because letting the less.js library process your CSS continuously at the time when a user requests for a particular web page can impact its performance. So, when you are ready to completely use LESS in your web development projects, the best option requires you to install it and set it up on the webserver.
Recommended Product
If you are starting with the development of the hotel website based on WordPress, we can recommend our responsive WordPress hotel theme. It’s based on an elegant dark color scheme, but also comes with lighter color variants that you can enable. Many aspects of the theme can be controlled through WordPress Customizer.